Tuesday, April 23, 2013

RV Walls - Brainstorming Session!

Since the RV progress has been stunted by a temporary funding interruption until Thursday (in between the lines:  we're coasting until payday), I decided to brainstorm about the wall covering options before jumping into my original thought - which was Formica.

That may sound like an odd choice for a wall covering, but I've heard of it being used on RV walls before.  It's lightweight, pliable, and (relatively) easy to install.  If you're thinking that also sounds hideous, think again.  There are a gazillion new designs, and some of them are pretty trippy if I do say so myself:

Endless Smoke reminds me of the LED bars at a Pretty Lights show, or just general sound levels on electronic equipment.  For a funky RV headed to music festivals, it seems perfect.  Love it.


Blueberry Halftone and Tangelo Halftone are two of the most fun patterns I've ever seen. It's like music for the eyes!  I think it might be too much for the walls, but I'm keeping it in mind for the tiny countertop in the kitchen....


Mint Dotscreen might not look that exciting, but the overall effect of it on the walls would be pretty trippy!  It's a definite contender in the Formica category.  There's also a Tangelo like this, but I think that might give me a headache.


Because the theme of the RV is to be as fun and trippy as possible, it's unlikely I would end up going with something simple like this.  But it's worth noting that it's an available option!


As Formica goes, this lemony Citrus Halftone is definitely a frontrunner.  It's soothing, yet energizing.  Fun when it would need to be, and relaxing when it was time for that.     


As it turned out, when I did the brainstorming for my last post about the flooring, I found out a little bit about vinyl floor coverings and started looking into them for walls.  eazywallz.com has lots of options in all kinds of amazeballs images.  Some of my faves?


The Andromeda Galaxy.  I can't tell you how much I would love, love, LOVE to have this on my walls on the daily.


Still really searching for a truly amazing forest photo.  This one is just OK.  I'd like one that was a little more...enchanted?


Definitely my favorite!  I love the birch trees!


All of these IMPOSSIBLY trippy patterns make me wish I was still acquainted well enough with Photoshop to actually try them out.  I'd really like to think I might even be able to incorporate multiple different ones into the tiny space I have.  Then again, I'm going for trippy, not nauseating.

We'll see!  Suggestions welcome!  What did you put into your RV project?

Friday, April 19, 2013

Flooring, Part 1

I title this "part one" because I am neither foolish nor focused enough to try to compose all of what encompasses reflooring an RV into one post.  This will probably be at least a three-part series, ugh maybe more.

The original floor in the Starcatcher was carpet...

Isn't it pretty?


In an RV, this is a terrible idea.  It's for traveling, for God's sake.  You're purposely driving it from one dirty place to another.  It cannot possibly hold up to the amount and variations of mud and particle dust that will be accumulated across the country.

We're going to do the only sensible thing, and rip it out.  It's raining today (and has been for the past few days), so for now, I'm wanting to compare flooring options until I can attack that 40-year-old fiber.

Now, I like the atypical, so I'm interested in alternative flooring options that could have some potential.


A fat Sharpie and some imagination were all this artist needed.  Ink on PVC vinyl.

Pennies on this bathroom floor in Texas...

and this is amazing...done with vinyl floor tape.


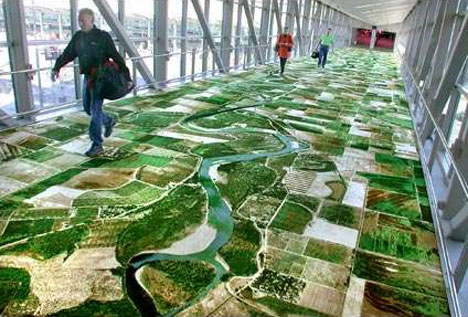
Here is a floor made with an aerial digital photograph printed onto vinyl sticker.

 Besides these very unusual options (and I am seriously considering the giant photograph on vinyl), it looks as if my best traditional flooring options are as follows, with their pros and cons:

Vinyl:  Really not being seriously considered as a flooring option for us because it's not a natural product, but vinyl flooring is staying in the running because it's so damn cheap.  

Vinyl is an inexpensive option, but not very exciting or natural.


There are countless options and the price is unbeatable, but it remains a rarely-discussed (if at all) flooring choice because it's a PVC resin made from chlorinated ethylene.  I found some at the home improvement warehouse around the corner from us for .39 per squre foot and some slightly nicer for .48 per square foot from another home improvement warehouse just down the street from it, so if we get super broke it's something I'll look into - but for now I'll probably stick with another option.

Cork:  Super gorgeous cork flooring is durable, lightweight, versatile, sustainable, ecologically friendly, does not leech chemicals, and with proper care can last forever.  


This is the type of cork floor we're looking at.


The one downside is that I don't particularly like the slight color variation in tiles that causes the higgledy-piggledy sort of design you see here.  It's not the lighting or anything either - there are several customer images of this style number and the color variations are all the same - slight, but obvious.

This is the only style number I'm considering because of the price of the other types.  Most cork flooring is around $3.50-$5 per square foot - and while the area of flooring I have to do IS super small (under 80 square feet), I still want to try to avoid high prices if possible.


Linoleum:  Priced about the same as Cork but with more vibrant color options, linoleum is made from linseed oil, pressed cork fiber and limestone dust (among a few other natural components) and is pressed onto a jute backing.  It doesn't leech chemicals and has always been sustainably processed.

Marmorette Linoleum

The two most common types found are Armstrong Marmorette Linoleum and Johnsonite, with Johnsonite offering much more color options for around 1.5x the price of the Armstrong.  Johnsonite is only made from about 98% renewable materials and only about 76% of those are sustainably processed.

Marmoleum:  Made from recycled materials, Marmoleum falls pricewise slightly higher than Linoleum and probably close in price to Johnsonite.  


Durability and beauty are both unmatched for Marmoleum, but beware of shady online dealers.

A much wider color palette makes Marmoleum a fantastic option, but the exclusive flooring comes with a caution:  several of my friends ordered this flooring online and were sent defective flooring and then treated quite poorly.  Refunds were refused and issues still persist.  Ordering from a reliable website should eliminate these problems, and the floors' durability will reportedly outshine that of nearly any other flooring.

Bamboo or Wood/Laminate: Again not really being considered for our RV, Bamboo, wood, or laminate wood flooring is an option for many out there.  

Wood in an RV can be beautiful.

Wood isn't exactly high on the list of eco-friendly options, as it's generally not sustainably harvested.  I'm probably also not particularly patient (or skilled) enough to install wood flooring, which is something of an art.  That being said, I do love the look of these floors and have given some thought to them - it would have to depend on how much assistance I can get.


All in all, each of these will come down to budget for us (and so many others).  Factors to consider:

-square footage
-amount of use
-durability
-longevity
-performance in various weather and elements (dirt, snow, rain, water, pollen, mud, etc).
-ease vs complexity & time consumption of installation
-practicality
-and of course, magical trippiness!

I'll be weighing these options for several weeks to come, so any input is greatly appreciated!

Keep on tripping!

~Jessica

Monday, April 15, 2013

Removing Cabinets

Well, the good news is that the RV's cabinets are coming out slowly but surely.  In more irritating news, the original handles in there were gorgeous, so I wanted to keep and reuse them.  Why is this irritating?  Because they were installed with square screws 40 years ago, so they are less than simple to extract.
The're gorgeous, though.

So we started by gradually removing all of the cabinet doors from the RV.
I say "gradually" because it's taking forever.


We're keeping the cabinet frames, since they appear to be in pretty good condition.
They'll come out just before we replace the wall and go back in afterwards.

The wood is actually pretty beautiful.
And I definitely want to save this little plaque!

I removed the hardware from the cabinets.  This took even longer than removing the actual doors.
These will get a rejuvenation and then new patina treatment later.  For now, I just gave them a superquick wash in an all natural tea tree oil based cleaner.  Because of the small and contained nature of RV space, I'm trying to be very careful what cleaners have been used.  We'll probably use some bleach during the de-molding phase, and perhaps some kind of insect barrier (it is going to be our road home, after all), but besides that everything will hopefully stay natural.  

I'll be moving onto the back soon!  Hopefully we'll have some sketches soon of the box storage bench-to-table that we've been designing.  I'm definitely in need of some kind of 180-degree hidden hinge.  Looks like a trip to Lowe's will be due soon...


Gutting the RV!

It was raining today, so I decided to take the opportunity to actually record what gutting process has occurred so far.  

At first, we thought the interior was in original condition, and we really wanted to just fix it up.  But upon doing some research, we found out that most of the inside had already been restructured and poorly renovated in 1995, so we decided to go a whole different route with it and make the tentatively-named Starcatcher a psychedelic experience machine.

As we plan to travel and have some very rich experiences in the bus, we really want to make it a comfortable and inspiringly dreamy place to chill, veg, and enjoy various experieces.

We started by evaluating the space on the interior:

Looks good, but the walkway was really cramped in between the seated table area and kitchen.  We'll talk about the back area another time.


The kitchen was definitely in pretty good shape, and I really liked all of the old appliances. 
It's also VERY expensive to replace RV appliances.  So we decided (well, our budget decided) that we should keep our existing old ones and just shine them up.  They'r'e cool and vintage, and they work!

The fridge is very sexy on the outside, glossy and smooth with no damage...
The inside is clean, but stained.

The stove is pretty much pristine...

It has a few minor rust spots, but really nothing that can't be lightly sanded and repainted with high-heat enamel and then sealed. 

My main issue definitely was the table area. 

Notice how the seat juts out past the wall into the walkway area?  This does not fold up or tuck in in any way and is annoying when you're trying to walk back and forth.  Ryan is not a small man, and I've got my family's traditional curves - this did not work for us.  

So I started by taking out the seats and the backs.
The biggest problem was that back that would not detach from the paneling wall.  
But this is no big deal since we'll be pulling out that paneling very soon also...
Since, of course, there was termite and mold damage inside :/  It's OK, I expected it.


Next, I took out the other side, and cut out the seat belts until I could get the bolts up off the floor.
I also cut away the 40 year old piece of plastic that was on top of the carpet.  

OMG.  Disgusting.

It was a LOT of work, but thankfully Ryan and Saint Mechanic helped out (kind of).  I'm excited to start looking into materials for walls and floors, and to start designing the new seating area.  Any suggestions on environmentally friendly, lightweight, affordable flooring would be fantastic.  I only need about 50 square feet of flooring, unless it's inexpensive and able to be used for walls - in which case I would need probably around 200 square feet, possibly more.

But first - before fun stuff like design - more demo.  Next up:  removing old cabinet doors.  *sigh* I gotta rest first...


Sunday, April 14, 2013

Welcome!

Today is the first day blogging for moondreams&magic.  As I am quite aware that I have absolutely zero current subscribers, it does feel a little like I'm talking to myself.  I'll get over it.  I'm kind of used to that.

So for now we're mainly concentrating on the RV renovation.

Here's an intro to the RV, our 1973 Dodge Coachman Reo Pace Arrow.  Yeah, it seems to have an awful lot of names.  We're still trying to ascertain exactly what it is, but for now it's dubbed the "Starcatcher."  This is more than likely a temporary name that will end up giving way to its real name, which will probably be determined once it's been taken on a road trip or two.

Our first experience with the Starcatcher came in the form of not being able to find the place she was located.  The yard was so overgrown, it was barely possible to see the tiny house from the road.  We drove down a short gravel driveway and parked in front of a small metal workshop with a bonfire in a barrel outside.  And there it was...

Yikes.

I mean, she wasn't much to look at right off the bat.  The light wind caused the door, which was hanging on the hinges, to clatter against the exterior skin.  Sad-looking streams of moldy tears dripped from her soggy roof, and a horde of leaves had to be brushed away to pop the hood open so Ryan and our saint of a mechanic, Charles, could look inside.

When I finally got the guts to venture inside, I was pleasantly surprised....

The interior was nice and clean.  Lots of original charm to work with.


We checked out all of the inside....


Then started it up...

Everything looked good!  

It had to be hot-wired, but this was a minor detail.  The Saint gave us the go-ahead, and we jumped on the opportunity to purchase.  In short order, we had done the deal and brought her on home.  Ryan spent the entire Sunday afternoon pressure-washing the outside and making her shine.  


Proud RV parents!

More info on the plans for the Starcatcher and her renovation to come next.  Stay tuned!